Monday, April 30, 2012

Just Ordered From Amazon

"Sometime last year or earlier this year when Fur Feather and Fin out of the UK sent me a catalog, I noticed this book, The Shoot Lunch by JC Jeremy Hobson.  Fascinated by European Estate Shoots, I wanted to order it.  But since overseas shipping from the UK is always, for some reason, ridiculously cost prohibitive, I did not and in time I simply just forgot about this book.   At that time no US seller had stocked it as it was relatively new.  Looking through that catalog today, it rekindled my interest in this book.  So I search for it on Amazon and lo and behold the US Amazon actually stocks it.  So I picked it up. 

Since I don't always understand British English I had to look up the meaning of Craic (pronounce crack), a word found in Northern England, Scotland, and Ireland, which is essentially the same as the American equivalent of "Bull-Shitting" or more politely-gossiping or fun, entertaining conversation.  Learn something new everyday. 

Fly Fishermen Who Don't Tie

This silly fly was created by Bryan Webb partly as a joke, nonetheless I still
took it with me to Costa Rica to see if we could coax a fish to take it.
Sometimes ridicule is warranted,  for instance if you showed up at an Estate Shoot in all camouflage or in blaze orange coat. Certain traditions dictate certain rules that should be followed.  As such is the case with fly fishing and fly tying. 

In my time as a fly fisherman, I have met and fished with several so -called "fly fishermen" that don't tie.  Can one call themselves a "Fly Fisherman" if they don't tie?  This article was linked on a forum I follow and it made me think of all the guys I've met in the past that don't tie yet wax poetic about how they are a "fly fisherman."

Personally I think if you don't tie, you aren't a fly fisherman.  You are just a guy who fly fishes.  Tying is an essential part of this sport/hobby.  It connects you with not only the fish you catch but the history of the sport.  Every time you tie a Royal Wulff (or any fly for that matter), it connects you with history and not only Lee Wulff but the 1878 fly which it was a derivative of, the Royal Coachman,  that John Haily invented. 

Tie or don't tie I really don't care.  It doesn't make you a better fly fisherman or better person for that matter if you tie.  But if you consider yourself a "Fly Fisherman" you should tie.  You don't even have to good at it.  Ugly flies catch fish too.  In fact my friend Joel, who ties the ugliest flies ever (even he admits it), can probably out catch just about anyone with those god aweful creations of his.  In this day of youtube and the web, learning how to tie is easy.  Before the proliferation of the Internet, I self-taught myself using books and videos.  Tying kits can be had for less than $100, so what's stopping you.  Quit buying those stupid $0.75 chinese-made flies and join the ranks of fly fishermen. Join the tradition, the history and you too will quickly realize why tiers "look down" on nontiers. 

C&F Design Wet Fly Case

C&F Design magnetic 3/3 box is unavailable here in the states.  I purchased two of these in Japan back in 2005.  I had completely forgot I had them as I have not done any steelhead or salmon fishing in several years.  The case is designed for medium sized wet flies (size 4-8).  On each side it contains 3 rows of 5 magnetic holders.  In the center is a divider that holds a dropper wallet on each side.  The case is an ordinary s-sized C&F case.
Although unique, the dropper wallet is something I've yet to completely figure out.  I can not seem to make it work properly.  The theory is you can pre-rig a dropper for fast and easy set up. 
The magnets are strong and hold the fly very firmly.  With the case open I have shook it violently to see if I could pry a fly out it place and could not.

It Only Took Me Ten Years

Finally I have completed my Sage DS2 590-2 after about ten years.  This rod as I mentioned in a previous post has sat in the corner or my room collecting dust.  I had completely forgot about it until I mentioned the rod building class at Marriott's to Chul.  He offered to buy the rod from me.  Since the rod, for the most part , was completed, and all I had to do was epoxy it together I agreed.  It took some time for me to actually get the project going again as I had to tear down a few walls in the house due to a plumbing leak and a pesky bee hive in the wall.  With all the drywall dust in the air I didn't want it settling on the epoxy so I waited.  Also the fact I hate working with epoxy, let me procrastinate more than I should have. 

Sage DS2 590-2 Completed.
The rod is now completed and while I originally was unsure about the blue wraps and the modified wells handle, the rod is quite attractive.  I casted it today with a SA wet cell type 2 line and it casts like a dream.  I was casting all the fly out without any trouble.  Its been a while since I casted a DS2 but every time I do I am reminded of how nice they are for an entry level rod.

Sage RPLXi-890-3 reunited

Laying in the corner beside the DS2 for eight years was my tip section of my Sage RPLXi 890-3. After shattering the tip with a clouser during a slow day at the river jetty, I received a the replacement section weeks later. I wrapped the rod and never ended up epoxying it all together. I had bought a Sage XP 890-4 soon after breaking the Xi because I needed all my rods I was to take to my first trip to Costa Rica to be four pieces. Over time a few wraps came undone which prolonged me from completing this project since the rod had the more difficult and time consuming trim wraps.

Well since I was going to do Chul's rod I decided to finish that 8wt while I was at it.  The 8wt and I have had a lot of memories and it was one of my first "premium" fly rods.  Sparing no expense on it, I added only premium components-recoil guides, H&H stripping guides, a Struble titanium reel seat and premium cork.  It was light and casted nicely.  I remember while fishing Catalina Island on Bryan Webb's first boat, the Sea Spider, he casted it out and commented how nicely the rod casted.  With plans on fishing MVL again on Thursday, I plan on reuniting with this old friend and hopefully with some luck I'll be reminded on how a fish feels on it.


Saturday, April 28, 2012

Poon!

 
  More pics from the past from the albums of Richard and Bill.

Friday, April 27, 2012

Heeling Up Quite Nicely

With a week of heeling under his belt, Kaiser's leg is heeling up quite nicely.  The Vet decided that he needn't the bandages anymore and stitches will come out on Wednesday.  We'll be throwing bumpers at the park in no time.


Thursday, April 26, 2012

Simms This Is What Happens When You Move Production To Emerging Nations

The eternal debate with me is always how to carry my gear.  Waist pack or vest.  I've gone through all methods, first with a vest, to chest pack, to backpack, to waist pack.  Last year I decided to go back to the vest despite using the waist pack for years.  I have never been a firm believer of the vest but because I generally pack a lunch and carry a water filter I decided to go back.  One problem I have with the vest is that it generally makes me carry more gear than I want, not to mention it makes you look like a complete dufus.  So on my last outing I decided to go back to the waist pack since I wasn't packing a lunch or needed to carry a water filter.  Of course since I moved back, something had to go wrong.  My pack basically disintegrated.   The tape and the seams all started to fall apart.  It started at the seams near the zipper and then the back panel which holds the belt started to go.  Luckily I wasn't carrying much gear and my pockets of my quick drying Ex officio pants were big enough to hold everything.  The pack thankfully lasted long enough for me to fish the rest of the day without issue.  The same issue happened to my Simms wading bag the glued seams came apart.  Simms this is what happens when you make your stuff in China.  Bring production back to Montana or any other first world country and this type of shit is less likely to happen.  I certainly hope this is covered under warranty because if they make me pay to repair it, I will no longer be a Simms fan.


Baby's Back Home

About a month ago I broke the tip of my favorite rod, a T&T Helix 5wt SW, while carp fishing.  This was the second time I've sent this rod in for repairs.  The first was just before I was to head out to Costa Rica, I shattered the tip with a clouser while fishing in the bay with my late friend Yosh.  I had originally bought the rod for the purpose of fishing the jungle species of Costa Rica.  I had heard nothing but bad things about T&T's repair turnaround time.  With only a couple months until I'd be leaving for Central America, I pleaded with T&T to rush the repair.  They managed to get me rod back to me before I left for that trip for which I was extremely grateful.  So when I turned in my rod once again, I was told not to expect much.  I was hoping to get this rod back for the May opener for Barrett Lake.  Again T&T managed to get me my rod back before the opener not that it matters now as I was unable to acquire any tickets.  Well I'll have to try and get tickets for June and I will most definitely be bringing this rod with me.  The Helix and the bass of Barrett Lake (and just about every water in California) are very well acquainted.  Its time to get them acquainted once again.  Repair cost $50.  Shipping $13.

Fire!!!


One of my greatest fears while outdoors is being stuck out in the woods without the ability to make fire.  I have tried unsuccessfully rubbing hardwood together and it is not only difficult but energy and time consuming.  I hope I never have to make fire that way or any primitive way for that matter.   That said when I go deep into the woods I usually carry redundant systems to make fire or I make sure my partner has a fire making tool with him. 


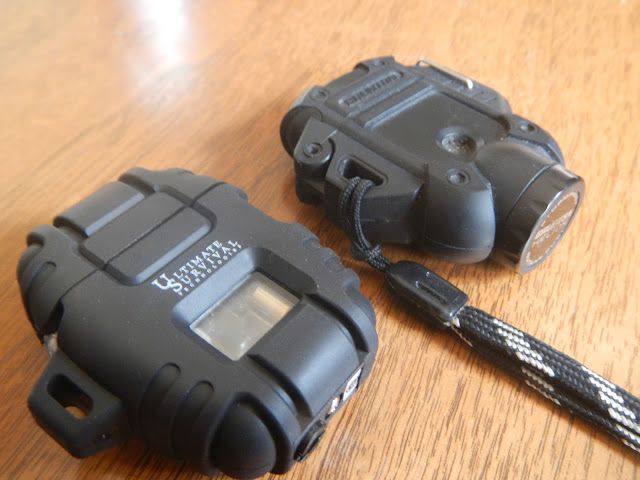
While in REI I was looking for a small S-biner, I started looking through the aisles and found my self in the fire making section.  I saw a fire starter and lighter that caught my interest.  Both were made in first world countries that peaked my interest even more.  The fire striker was the Swedish Fire Steel 2.0, made in Sweden, surprise surprise.   And the lighter was Ultimate Survival Technologies Delta Stormproof Lighter, made in Japan.  Despite the name of the company, which is the lamest name ever, anything with "ultimate" or "extreme" I generally shy away from but this product I couldn't resist. I am a sucker for lighters for some reason.  Being made in Japan and having curiously similar qualities of my Brunton Helios lighter I wonder if the two share the same manufacturer. 
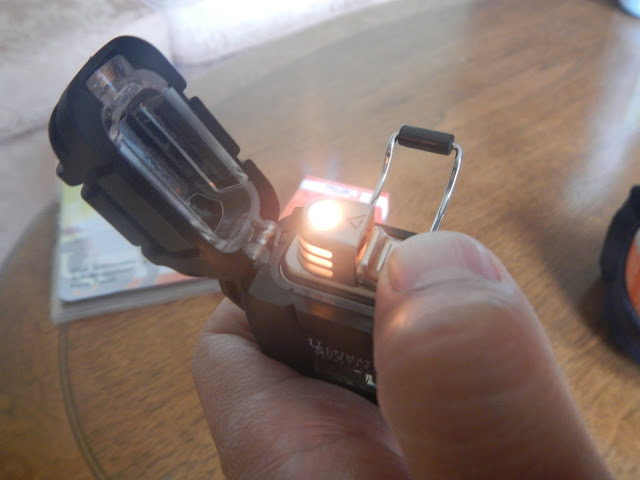
 Much like the Helios lighter, the new lighter uses a Piezo Electronic Ignition and claims to be good for over 30,000 instant ignitions.  In the past back in my cigar smoking days, I did not have much success with these types of ignitions.  That being said my Helios has yet to fail on me and has been the first one that has actually lasted.  The Delta is also windproof up to 80 mph, and is water resistant as it is sealed with an o-ring.  The two share the same rubberized case that is shockproof and impact resistant.  They also share, although different in execution, a latch that locks the pop out hinged cover.  Unlike the Helios, the new lighter has a very large fuel window to make it easy to check fuel levels.  Fueling is easy and it is recommended that you use premium Butane or quadruple refined Butane gas fuel.   Here I use my stove fuel with a Brunton FuelTool adapter.  Ideally, unlike the picture, you should refill the lighter upside down.

The catalyer coil provides continuous ignition of the gas vapors creates a clean, bright, hot flame of 2000 degrees Fahrenheit.  As the flame is odorless, the lighter is suitable for cigar lighting without contaminating the subtle flavors of a fine cigar.  The fuel capacity is 1 gram of butane and burns for over 30 minutes.  The overall weight is 2 oz (56.7g).  Unfortunately it does not come with a lanyard like the Brunton but does have a side vent that allows a lanyard to be placed.  The lighter is designed to perform well up to 8,000 feet but not recommend over 10,000.

The next purchase was a fire starter of a different sort.  Like I said before, I like having a backup when it comes to fire.  I am not unfamiliar with magnesium fire strikers, I carry an older version of one in my traveling car camping kitchen.  But unlike this newer model, it did not have a strike blade so you needed to use your knife. It is smart to keep one of these as it truly waterproof and will never deplete like lighters.  An interesting feature on the blade is that the handle has a built in whistle.  Like firestarters, you can't have enough whistles in the wild.

The main reason for going to REI was to buy some small s-biners so that I could keep my Brunton FuelTool attached to my backpacking stove kit.  Typical, go to REI with the intention of spending $3, leave spending $80.  At least now I won't worry about not being able to start a fire or about losing my FuelTool.  The FuelTool is no longer available from Brunton, nor is my Optimus Crux stove.  The original OEM for Brunton is now selling these products under their name Soto Outdoors, who make very good products that are highly acclaimed.  I highly recommend them and to my knowledge, their products are all still made in Japan.


Wednesday, April 25, 2012

Sporting Shot Issue 10


The new issue of Shooting Sportsman's free online magazine, Sporting Shot, is now available.  While I never really liked the online version, the "Chicks with Guns" title did catch my attention.  Unfortunately as I found out when I perused through it, why it was not call "Hot Chicks with Guns."  One article I did find nice though was the article on Jim and Jerry of Ivory Beads who closed their doors for good this month.   If you this magazine appeals to you, you can subscribe for free.

Filo Nymph Fly

Materials:
Hook: TMC 3761 (or similar nymph hook)
Tail: 3 Filo Plume tips
Body: Chopped filo plume dubbed and tapered to form a body
This is an old fly created by Chris Mathews at Blue Ribbon Flies in Montana.  Its simple to tie and uses normally discarded material.  To my knowledge this fly is unpublished as I have never seen or read about this fly anywhere.  It was not until my friend Mike made me aware of it that I knew it existed.  Thirty or more years ago when he first opened his shop, Chris told Mike about this fly.  From then on, this happens to be Mike's favorite fly to fish on just about any trout water.  He has slayed them at Yellowstone and is his go-to-fly when float tubing at Crawley Lake.
Filo that is needed is not the paper thin puff pastry but the feathers that exist in between the rump feathers of the pheasant (or just about any large bird).  It is soft and delicate and provides the undulating movement that fish love, very similar to that of marabou.
Variations:
Beadhead version
Kern River Emerger Version (pheasant rump feathers used as legs, thin foam as wingcase)

Sunday, April 22, 2012

Gourmet Silverside Minnow

I created this fly before I fished Diamond Valley Lake last year although it was slightly different since I didn't have the UV system back then.  I read they stocked the lake with shad and inland silversides.  So I created this fly to mimic the silversides.  It was my first time at DVL and I managed only one fish for the day, a smallmouth with this fly.    I got several bumps on this fly until I lost it in the weeds.  I had only tied one.  No other fly got so much as a bump.  Although I've yet to try it in the salt, I'm convinced it will work just fine.  I'll be trying it this year as two of my fishing buddies have recently acquired boats.  Should be a good summer.

Material:
Tail:  2 Chartreuse Hackle
Side:  Sliver Mylar Tubing, Heavy Mono at least 60lbs (4-6inches)
Body:  SF Blend- White, Camo, Baitfish Angel Hair
Thread: Mono thread
Eyes:  3D eyes
Hook: Gamakatsu B10S Stinger
Head:  Loon UV Fly  Finish and UV Light and Hard as Hull
Place the end of the heavy mono on the vise.  It is not necessary to clamp too hard on the mono.  Just enough to hold it.  Wrap the mono thread toward the jaws of the vise.  Do not wrap to the end the thread will simple fall off the mono. 
Take the two hackle pieces and cut the tip to create a tail.  Fold back the fibers and tear them off exposing the stem.
Place on top of the hard mono and tie.  Zap a gap or UV light the wraps, do not cut the thread off just yet.  There is no need to whip finish, in fact its just too hard to whip finish it without it slipping or messing up the tail material.
Take the hard mono off the vise.  Slide the  mono into the Mylar tubing.  I do not remove the cotton rope in the tubing.
Once tubing has reached the edge, tie the tubing down.  Spread Loon UV fly finish and hit it with the light.  Again there is no need to whip finish.  Cut the thread and set aside for now.
Place hook on vise.  Any type of saltwater, bass, or streamer hook will do.  I use the Gamakatsu Stinger hook.  Tie a thread base with the mono thread and then place the tail material on the hook and wrap, locking down any fibers of Mylar that may have popped out.  Wrap throughout the shank of the hook.  Pay particular attention that the tail is upright and riding true.
Add the SF Blend body next, white underside of the body first and then the top side camo next.
Add the baitfish Angel Hair atop the camo SF Blend.  Build a little head with mono thread and then whip finish.  Add Loon UV finish on the top and bottom of the head and hit it with the UV light.  Do not add UV finish to the sides yet.  I find that when using 3D eyes, that if you keep the sides clean the eyes stick on better.
Once cured add the eyes to each side.  Cover gaps and cover eyes with UV Finish, making sure you form a head and then hit it with the light.  Finish the head with Hard as Hull or any other gloss cement to remove the tackiness.
I plan on using this fly quite a bit as you can see I'm loading up.